今回はプログラム系、特にユーザーインターフェース周りのお話です。 ここでは、
Python & QtDesigner & Pysideを使った作例をば。
最近の3DCG系ソフトはだいたいPythonをサポートしているので、多少の違いはあれど、どのソフトでも応用がきくのではなかろうかと思いまして書きました。
ただしあくまでCG屋が書くプログラムなので、そこのところあしからず。
いくつかある作例の中の一つとして捉えていただければ。
流れは下のようになります。
このフローのメリットは、”③コードを好きにいじる”につきます。
コードを書き換えることで、QtDesignerではできないようなカスタマイズをしたり、製作現場のニーズに合わせた変更がしやすかったりすることです。
逆にデメリットは、③でコードを変更した後で、①に戻ってQtDesignerを使ってUIを修正するというのがとても面倒だということ。(大きなUIデザイン変更がなければ問題ないんですけどね)
なので、QtDesignerで大まかにUIの雛形を作って、それをもとにガリガリコードを追記変更してゆくという感じです。
実際にやってみます。
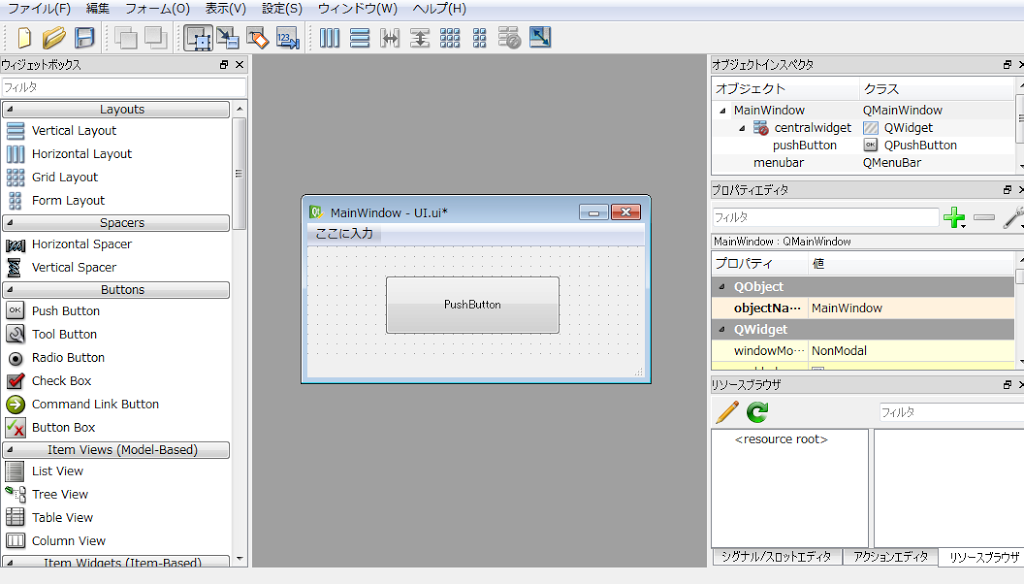
①:Qt DesignerでUI作成
最近のMayaがインストールされていれば、次の場所にあるはずです。
“C:Program FilesAutodeskMaya2014bindesigner.exe”
サンプル用に、ボタンが一つだけのシンプルなUIを作りました。
ボタンを押したときのスロットを追加します。ボタンを押しましたよ、という信号を追加するという意味です。
[編集]→[シグナル/スロットを編集]
ボタンを触って適当にドラッグすると、赤い矢印が出て、シグナル/スロット接続を設定します。
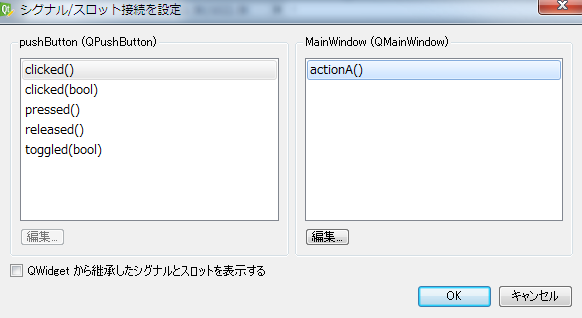
Clicked()を選び、右の枠の編集ボタンを押します。
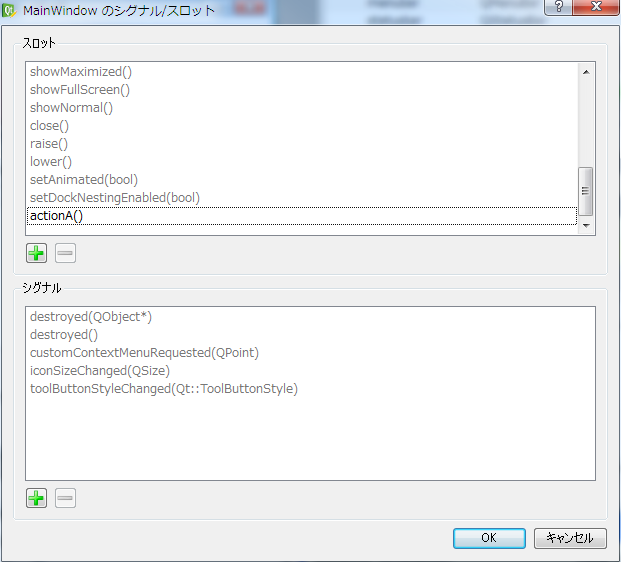
新規でスロットを追加します。ここではactionA()としました。
ボタンをactionAを関連づけておきます。関連づけが完了するとこんな感じになるかと。

これで、一旦保存します。
ここでは、名前はUi.uiとしました。
これをUIの雛形とします。
②:PySideにコンバート
変換には”pyside-uic.exe”ってのを使います。
PySideがインストールされてれば、使えると思います。
バッチファイル作ってコンバートするのが良いと思います。
Maya2014とかで、すでにPySideがインストールされている場合でも、変換用のpyside-uic.exeがない場合もあるので別途PySideをインストールする必要があるかもです。
バッチファイルの中身はこんな感じでしょうか
path = %path%;C:Python27Scripts
pyside-uic -o UI.py ui.ui
1行目はパス指定。 2行目が変換コードになります。
“pyside-uic”が変換コマンド。 ”-o”が出力先指定。 最後が変換するuiファイルとなります。
このバッチファイルをuiファイルと同じ場所に置いて実行すると、uiファイルからpythonファイルが作成されます。
③:コードを好きに変更する
変換しただけでは使えないので、ちょっと手を加えます。
変換した直後のpythonコードは↓のような感じ。
# -*- coding: utf-8 -*-

from PySide import QtCore, QtGui

class Ui_MainWindow(object):

    def setupUi(self, MainWindow):

        MainWindow.setObjectName("MainWindow")
        MainWindow.resize(348, 159)
        self.centralwidget = QtGui.QWidget(MainWindow)
        self.centralwidget.setObjectName("centralwidget")
        self.pushButton = QtGui.QPushButton(self.centralwidget)
        self.pushButton.setGeometry(QtCore.QRect(80, 30, 181, 61))
        self.pushButton.setObjectName("pushButton")
        MainWindow.setCentralWidget(self.centralwidget)
        self.menubar = QtGui.QMenuBar(MainWindow)
        self.menubar.setGeometry(QtCore.QRect(0, 0, 348, 24))
        self.menubar.setObjectName("menubar")
        MainWindow.setMenuBar(self.menubar)
        self.statusbar = QtGui.QStatusBar(MainWindow)
        self.statusbar.setObjectName("statusbar")
        MainWindow.setStatusBar(self.statusbar)

        self.retranslateUi(MainWindow)
        QtCore.QObject.connect(self.pushButton, QtCore.SIGNAL("clicked()"), MainWindow.actionA)
        QtCore.QMetaObject.connectSlotsByName(MainWindow)

    def retranslateUi(self, MainWindow):
        MainWindow.setWindowTitle(QtGui.QApplication.translate("MainWindow", "MainWindow", None, QtGui.QApplication.UnicodeUTF8))
        self.pushButton.setText(QtGui.QApplication.translate("MainWindow", "PushButton", None, QtGui.QApplication.UnicodeUTF8))
これに手を加えます。 こんな感じにしてみました。 ちなみにMaya2014での使用を仮定して作ってます。 ボタンを押すと、”test”と表示される。ただそれだけですが。
# -*- coding: utf-8 -*-

from PySide import QtCore, QtGui

class Ui_MainWindow(object):
    def setupUi(self, MainWindow):
        MainWindow.setObjectName("MainWindow")
        MainWindow.resize(348, 159)
        self.centralwidget = QtGui.QWidget(MainWindow)
        self.centralwidget.setObjectName("centralwidget")
        self.pushButton = QtGui.QPushButton(self.centralwidget)
        self.pushButton.setGeometry(QtCore.QRect(80, 30, 181, 61))
        self.pushButton.setObjectName("pushButton")
        MainWindow.setCentralWidget(self.centralwidget)
        self.menubar = QtGui.QMenuBar(MainWindow)
        self.menubar.setGeometry(QtCore.QRect(0, 0, 348, 24))
        self.menubar.setObjectName("menubar")
        MainWindow.setMenuBar(self.menubar)
        self.statusbar = QtGui.QStatusBar(MainWindow)
        self.statusbar.setObjectName("statusbar")
        MainWindow.setStatusBar(self.statusbar)

        self.retranslateUi(MainWindow)
        QtCore.QObject.connect(self.pushButton, QtCore.SIGNAL("clicked()"), MainWindow.actionA)
        QtCore.QMetaObject.connectSlotsByName(MainWindow)

    def retranslateUi(self, MainWindow):
        MainWindow.setWindowTitle(QtGui.QApplication.translate("MainWindow", "MainWindow", None, QtGui.QApplication.UnicodeUTF8))
        self.pushButton.setText(QtGui.QApplication.translate("MainWindow", "PushButton", None, QtGui.QApplication.UnicodeUTF8))

class MyWind(QtGui.QMainWindow):
    ptr = 0
    for i in QtGui.QApplication.topLevelWidgets():
        if "Maya 2014"  in   i.windowTitle():
            ptr = i

    def __init__(self, pt=ptr):
        QtGui.QMainWindow.__init__(self, pt)
        self.ui = Ui_MainWindow()
        self.ui.setupUi(self)

    def actionA(self):
        print "test"

w = MyWind()
w.show()
加えたのは最後の方のclass MyWind(QtGui.QMainWindow):以降です。
Ui_MainWindowクラスを拡張して、MyWindクラスを作り、初期化やらボタンを押したときの挙動やらWindowが隠れないような設定をして、Windowを表示しています。
④:リリース
あとは各アプリケーションに組み込んだりして、リリース。
結構説明省きましたが、こんな感じです。
PySideではなくて、PyQtでも同様のことは出来たはずでした、ライセンス的大人の事情でPySideを使用するのがよいそうです。
管理人はMayaとかMotionBuilderとかのToolUI作るときはこんな手順で作ってます。
NukeのToolは作ったことないので分かりません。
MayaのMELはUI作るのしんどすぎるので、極力使いません。
MELでUI作るくらいなら、UIなしのツールをリリースします!
MaxはビジュアルMaxスクリプトで大体同じような事が楽に出来るのでそれ使ってます。
(ビジュアルMaxスクリプトで作れないUIもC#を使えば拡張できるそうですね。私はC#使ったことないので分かりませんが) 以上、PythonとQtDesigner、PySide使ったUI作成の例でした。
他のプログラマの方はどういった方法でUI作っているのでしょうね? ちょっと、気になります。
気になる方、お近くのプログラマを捕まえて聞いて見てください。
参考URLs DF Talk
http://www.dfx.co.jp/dftalk/?p=2934 http://www.dfx.co.jp/dftalk/?p=Q8177
http://blog.f-tools.jp/2012/02/pyside-with-qt-designer.html
pysideドキュメント
http://srinikom.github.io/pyside-docs/
http://qt-project.org/wiki/PySideSimplicissimus_Module_2_CloseButton_Japanese
ソフトウェアライセンスまとめ
http://smkn.xsrv.jp/blog/2009/03/summary_for_gpl_mit_cc_etc/


コメント